Shlyuz Implant Framework: Part 2 - Communication and Encryption
by Und3rf10w
Part 1 of this series dove into the influences of Shlyuz. This part will dive into the Shlyuz communication protocol and the way cryptography is used.
Before we can start designing a protocol that suits our needs, we must first create a target architecture to achieve. Again closely modeling Assassin, a Shlyuz deployment consists of 3 primary different components:
- Teamserver
- Listening Post
- Implant
There are additional unimplemented components like the console and builder, but these are not needed for Shlyuz to function.
Teamserver
The Shlyuz teamserver closely models the teamserver of Cobalt Strike and shad0w. As a long time user of Cobalt Strike, I’m intimately familiar with it’s architecture and design, so it provided a great model for how to implement a system that was somewhat decentralized and had support for a number of users. I’ve actually never use shad0w, so on the surface it sounds silly for me to provide such a strong endorsement, but the codebase is fantastic and is an excellent learning resource as the code is well written. Specifically the teamserver branch of shad0w provided helpful insight into implementing a flask based server that can support multiple users.
Step 1: Design
My typical programming workflow looks something like this:
- Create a general project design document outlining the intended goals of the project and the problem(s) that it’s intended to solve
- Initiate projects, VCS, etc for each component of the project
- Identify and map the lifecycle of data between components of the project
- Research existing projects, blog posts, etc that may be relevant to the current project (no need to reinvent the wheel; this step is important and can save you a lot of headache)
- Create individual design documents for each component that defines how I intend to tackle each problem the particular component is supposed to solve
- Create a MVP of each component that at the very minimum provides an end-to-end demonstration of the defined data lifecycle
Cry because you realize you architected something wrong and have to rewrite some major featureCopy and paste code from StackOverflow- Introduce new features as need to take the project to it’s minimum viable product.
As stated above, prior to writing any code, I at the very least like to author a design document that outlines the components I want to build, what I intended for them to do, and how I (at the time of the design phase) forsee it working.
The component design document doesn’t have to be anything special. My goal is to define what the component does, and how it interacts with the other components. For example, design statement I wrote for the teamsever was:
This is the service that the operator connects to. It interacts with the artifact factory and the listening posts. Orchestrates a Shlyuz deployment, receives output from implants, and issues commands from the operator to an implant’s listening post.
Very straightforward and to the point, but it tells me a few things:
- Teamserver is a consumer of output from implants, but never interfaces with them directly
- Consumer and producer of data directly to the listening post component
- Consumer and producer of data directly to the operator
- Teamserver needs to provide an interface to produce and receive data to and from the operator
- Teamserver needs to provide an interface to produce and receive data to and from the listening post(s)
- The data format needs to have some sort of transcript that identifies the listening post and implant, as knowing how to route a command is critical
Looking at these, you can begin to prioritize objectives to work on. The initial design statement helps you maintain focus on what you’re trying to accomplish and avoid the dreaded feature creep. These are not concrete, and will and SHOULD change over time. This is why you create a individual design document for the individual components later down the road.
At this point, I could attempt to start writing the server, but it’d be pointless if I didn’t know how it was going to communicate with different components. This is the first problem we have to solve.
Protocol Design
Before we go continue designing other components, we already have enough context to start designing a protocol that is robust enough to shuttle communication between components, supports data encryption, and is able to be wrapped by our modular transports.
We’ll need to ensure that the resulting text is plaintext, even if it’s binary data, or at least can be converted so. This will ensure that the data can be used by any transport module.
Each message of this protocol should support some type of metadata, chunking should be SUPPORTED, and ideally the messages would be formatted in a manner that makes them extensible.
JSON is a great format for this as we can arbitrarily add keys to each message, nesting data is fairly straight forward, and it’s actually sane to work with unlike some formats (I’m looking at you XML).
There’s probably better ways to do this, but I came up with this concept I’ll refer to as frames and transactions. A transaction is the representation of the exchange of frames between components.
Shlyuz Messaging
In Shlyuz, a message is divided into three different type of “data” frames. This model is chosen as its pretty extensible, easy to wrap portions with cryptography, and for the most part can be wrapped by basically any transport.
From the order of most trusted to least trusted, you have three “layers” of frames:
- Instruction frame
- Data frame
- Transmit Frame
Instruction Frames
At the most trusted level is an instruction frame. This frame is used to identify the destination of the message, the command associated with the message, arguments to the command, a timestamp, and optionally a history of the transaction.
{
 "component_id" : "STR", # The internal ID of the component destined for this frame
 "cmd": "STR", # The 'command' being issued by this frame. This signifies the type of data contained in the 'args' key.
 "args": "DICT", # A dictionary containing arguments associated with the given command
 "date": "DATETIME", # Timestamp of when the frame was created
 "txid": "STR", # A hex encoded uuid4 used to uniquely identify the instruction frame
 "uname": "STR", # OPTIONAL; Contains meta about the host the implant is running on
 "history": "DICT" # OPTIONAL; A dictionary of previous instruction frames associated with this 'transaction'
}
The history key is a special case and only present on messages destined for the Teamserver. This primarily is used as a pseudo-stacktrace that will allow an operator to analyze the history of a transaction, while also preventing an analyst on the implant side from getting a full view of the associated infrastructure, but a drawback to this is that the operator will only ever have a full picture of the transaction if the implant side replies. Thankfully this is fairly straightforward for the operator to diagnose, but is important to note. It’s a matter of OPSEC over convenience.
An instruction frame is converted to a string, and encrypted with a randomly generated RC6 key. This provides symmetric encryption.
Data Frame
The data frame really isn’t used for much other than enveloping the instruction frame and containing an the RC6 key to decrypt the containing instruction frames.
I use data frame to identify both the list of chunks, as well as the individual frames itself. Which doesn’t make much sense at first, but maybe this snippet will help provide some insight. The instruction_data in the snippet below is the rc6 encrypted instruction frame “chunk”:
encrypted_frames = []
for chunk_index in range(len(instruction_data)):
    frame_chunk = {"frame_id": chunk_index, "data": instruction_data[chunk_index],
                    "chunk_len": len(instruction_data)}
    encrypted_frames.append(frame_chunk)
Because of the way the RC6 implementation works in Shlyuz, the encryption routine returns a list of encrypted data chunks. These are split into the instruction_data variable, which is split into dictionaries that contain some metadata about each chunk and provide an order for the chunks.
The general structure of a data frame is:
[
  {
    "frame_id": "INT", # ID of the frame in the list
    "data": "STR", # Encrypted chunk of data in the frame
    "chunk_len": "INT" # total length
  },
  {...}
]
Once this list is made, the list is converted to a malformed hex string, and each byte is then XOR’d.
The malformed hex encoding/decoding routine looks something like this:
def encode_hex(text):
    return text.replace(b'a', b'j').replace(b'c', b'n').replace(b'e', b'l').replace(b'f', b'g')


def decode_hex(text):
    return text.replace(b'j', b'a').replace(b'n', b'c').replace(b'l', b'e').replace(b'g', b'f')
This is done solely to hinder automated analysis.
This XOR’d data is THEN prepended with the RC6 key (also ‘hex-encoded’) used to encrypt the instruction frames.
Essentially:
44 bytes: Hex string, represents the RC6 key, encoded with the hex_encoder, then hexified
x bytes: Representing the rest of the data
Transmit Frame
Finally, this is wrapped in ASYMMETRIC encryption using the private key of the component of that generated it, and the currently known public key of the target component. This data is then prepended with a 24 byte randomly generated cryptographic nonce.
Depending on the Shlyuz configuration, these asymmetric keys can be rotated in every exchange. So in this phase, prior to the asymmetric wrapping, Shlyuz can include the public key that the source component will use for the next exchange, and provide a private key for the destination component to use in the next transaction.
This effectively allows the encryption keys to constantly rotate and essentially ensures that ALL traffic from the very first transaction needs to be captured in order to decrypt any message ever exchanged between components. By acting as the authority that issues asymmetric keys, this allows the teamserver to trust and authenticate the source of the messages and prevents the ability to “spoof” implants as seen in other frameworks.
Effectively, the transmit frame becomes:
24 bytes: Randomly generated cryptographic nonce
x bytes: The frame itself wrapped in an asymmetrically encrypted envelope. Encrypted with the recipient component's public key, and signed by the source components private key
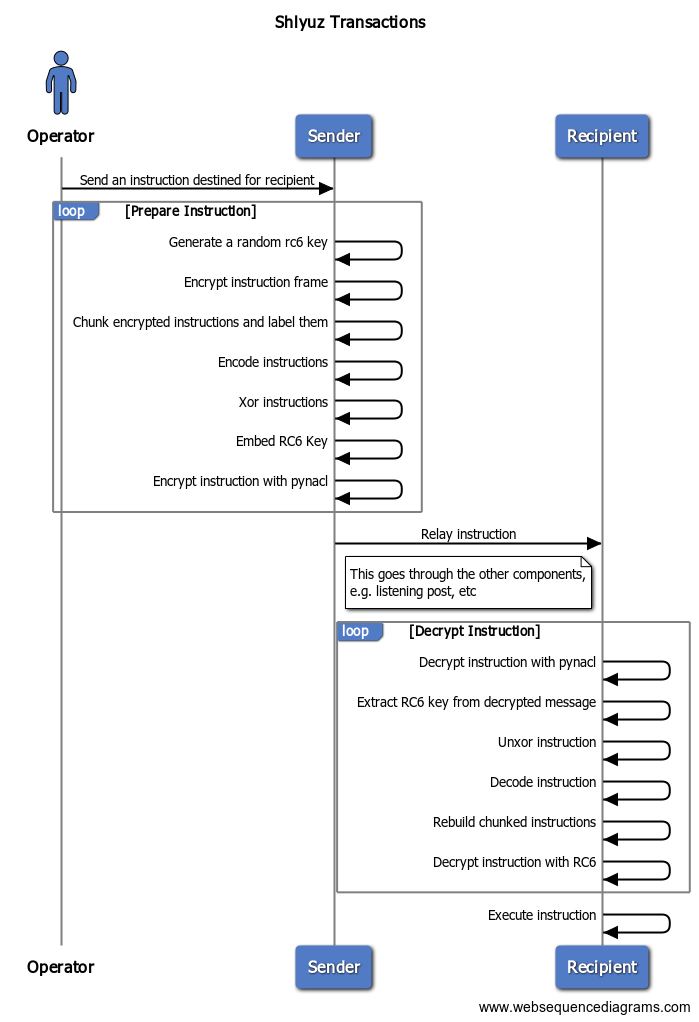
Transaction Flow
The above is a very convoluted way of explaining the lifecycle of a transaction in Shlyuz. This can be better represented with a sequence diagram:
Conclusion
For the sake of sharing, I’ve created a demo repository that demonstrates the encryption and communication features of Shlyuz and walks through how some of this is implemented. It’s not an EXACT match as to how it’s implemented in the final version of Shlyuz, but close enough to get the idea. For example, I don’t include key rotation in the demo, and it only represents one way communication. This is fairly straightforward to implement, but is left as an exercise to the reader.
There are probably much smarter ways of doing this, but going through the exercise of developing your own protocol can be very helpful. Honestly this was probably the most painful part of the development process, as I was trying to come up with a solution that was designed to be difficult to analyze akin to Assassin. Assassin described their crypto as:
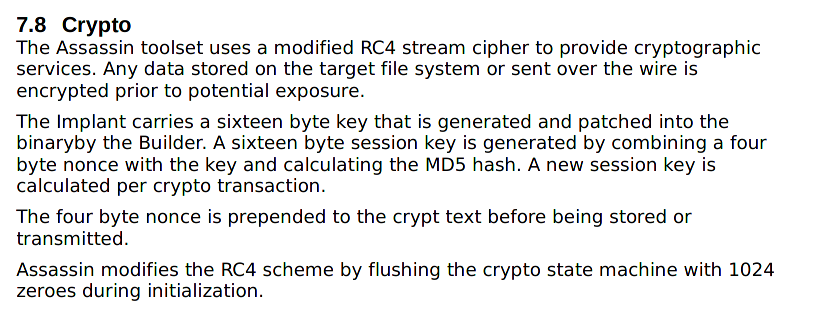
Adding an asymmetric encryption to the encryption routine was great as it enhanced one of the primary flaws I wanted to address in Assassin with Shlyuz. In addition, asymmetric encryption allows you to authenticate each individual component of a Shlyuz deployment, addressing a common flaw seen in many C2 frameworks. Is this an infallible solution? Probably not. I’d love to see practical attacks against this scheme. You can check out the demo repository, implement key rotation, and attempt attacks against it. Please share with me anything you’re able to find.
I am not a cryptographer and the included implementation of RC6 has not been audited by anyone. Do not rely on this for anything important. I STRONGLY advise against trusting me for any cryptography advice and also advise against implementing your own cryptography libraries.
If you missed it, check out Part 1 of this series!
seo tags: shlyuz - vault7 - implant - penetration_testing - red_team - assassin - CIA - cryptography - RC6 - pynacl